使用 Python 脚本自动创建或更新文件到 Gist
Created|Updated
|Post Views:
使用 Python 脚本自动创建或更新文件到 Gist
最近有一个配置文件需要多端同步,每次把文件传来传去感觉很麻烦。后来想想感觉放 Gist 是个比较合适的选择,但是去网页端粘贴更麻烦。
突然想起本人浏览器上安装的书签同步拓展就是借助 Gist 同步的,那它到底是怎么实现的呢?于是打算自己去看看 Github 官方的 api 文档,没想到其实比想象中的简单,所以写本篇文章记录一下要点。
◇ 官方文档
官方 api 文档地址:https://docs.github.com/zh/rest/gists
这里主要是使用里面的 2 个功能:“创建” 和 “更新”。
▷ 创建 Gist
- 请求
在文档中官方给出了一个示例,是使用 curl 调用的:
1
2
3
4
5
6
7
| curl -L \
-X POST \
-H "Accept: application/vnd.github+json" \
-H "Authorization: Bearer <YOUR-TOKEN>" \
-H "X-GitHub-Api-Version: 2022-11-28" \
https://api.github.com/gists \
-d '{"description":"Example of a gist","public":false,"files":{"README.md":{"content":"Hello World"}}}'
|
-L:表示跟随任何重定向。如果服务器返回重定向,curl 将继续跟随,直到到达最终的目标。
-X POST:指定 HTTP 请求的方法为 POST,向服务器提交数据,以便创建一个新的 Gist。
-H:指定 HTTP 请求头,这里有 3 条内容:
-
第一条指定客户端接受的响应数据类型为 GitHub 的 JSON 格式。
-
第二条是身份验证。需要去 Github 账户设置一个 Token,权限勾选 Gist 即可。
-
第三条指定所使用的 GitHub API 的版本号。目前示例中的就是最新版。
https://api.github.com/gists:即是目标地址 url。
-d:是 HTTP POST 请求的数据部分,即请求体。它是一个 JSON 格式的字符串,包含创建 Gist 所需的信息。里面指定了 Gist 的描述、是否公开,以及文件的内容。
- 响应
文档中还给出了响应的各种状态码和描述,以及附带了一个例子:
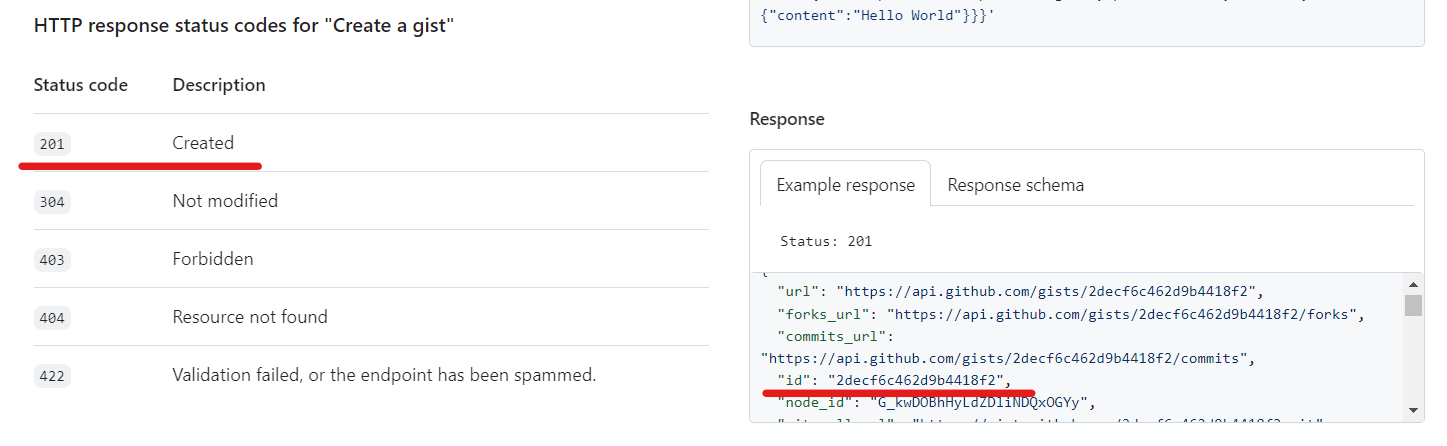
这里主要用到 201 表示创建成功,以及创建成功后的 Gist ID 保存在 JSON 里的id 字段,其它具体可以自行再查看文档说明。
▷ 更新 Gist
- 请求
同样的,官方也给出了一个 curl 调用的示例:
1
2
3
4
5
6
7
| curl -L \
-X PATCH \
-H "Accept: application/vnd.github+json" \
-H "Authorization: Bearer <YOUR-TOKEN>" \
-H "X-GitHub-Api-Version: 2022-11-28" \
https://api.github.com/gists/GIST_ID \
-d '{"description":"An updated gist description","files":{"README.md":{"content":"Hello World from GitHub"}}}'
|
-L:表示跟随重定向。
-X PATCH:指定 HTTP 请求的方法为 PATCH,表示要对资源进行部分更新。
-H:同上, 指定了 HTTP 请求头的 3 条内容。
https://api.github.com/gists/GIST_ID:即是目标地址 url,注意将 GIST_ID 替换成自己的 ID。
-d:同上,指定请求体内容。
- 响应
同样文档也给出了具体描述:
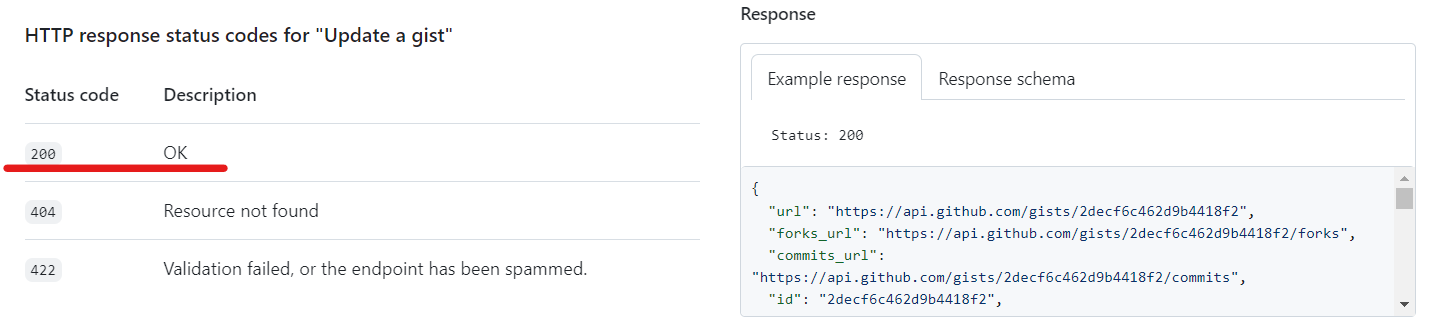
本次主要用到 200 表示更新成功。
◇ Python 脚本
因为需要上传的文件较大,而且在不同的路径,所以打算用 Python,而且方便增加一些其它功能。
▷ 代码示例
本次是利用了一个配置文件来进行输入,配置文件格式如下:
1
2
3
4
5
6
7
| [custom]
file_path = C:\Users\xxx
token = ghp_xxxxxxxxxxx
gist_id = xxxxxxxxx
|
PYthon 脚本如下:
1
2
3
4
5
6
7
8
9
10
11
12
13
14
15
16
17
18
19
20
21
22
23
24
25
26
27
28
29
30
31
32
33
34
35
36
37
38
39
40
41
42
43
44
45
46
47
48
49
50
51
52
53
54
55
56
57
58
59
60
61
| import requests
import configparser
config = configparser.ConfigParser(comment_prefixes='/', allow_no_value=True)
config.read('config.ini', encoding='utf-8')
token = config.get('custom', 'token')
gist_id = config.get('custom', 'gist_id')
file_path = config.get('custom', 'file_path')
with open(file_path, "r", encoding="utf-8") as file:
file_content = file.read()
file_name = "my_file.yml"
Authorization = f"Bearer {token}"
headers = {
"Accept": "application/vnd.github+json",
"Authorization": Authorization,
"X-GitHub-Api-Version": "2022-11-28",
}
if gist_id:
url = f"https://api.github.com/gists/{gist_id}"
data = {"files": {file_name: {"content": file_content}}}
response = requests.patch(url, json=data, headers=headers)
if response.status_code == 200:
print("Updated successfully!")
else:
print(f"Failed to update Gist. Status code: {response.status_code}, Response: {response.text}")
else:
url = "https://api.github.com/gists"
data = {"description": "A description of Gist", "public": False, "files": {file_name: {"content": file_content}}}
response = requests.post(url, json=data, headers=headers)
if response.status_code == 201:
gist_id = response.json()["id"]
config.set('custom', 'gist_id', gist_id)
print("Successfully obtained the new gist ID!")
with open('config.ini', 'w', encoding='utf-8') as config_file:
config.write(config_file)
print("Config file updated!")
else:
print(f"Failed to create Gist. Status code: {response.status_code}, Response: {response.text}")
|
▷ 一些说明
脚本中使用了 2 个模块:
requests 用于发送 HTTP 请求。它提供了简洁而灵活的 API,使得在 Python 中进行网络请求变得相对容易。
requests 并不是内置模块,如果没有需要先安装一下:
configparser 是一个用于处理配置文件的模块,上面用到的 config.ini 就是利用这个模块进行读取和写入操作的。
使用中发现 configparser 的 write 方法不会写出注释,它只关心键/值对。因此,原始配置文件中的注释在写回配置时不会被保留。虽然这个并不影响使用,但配置文件的可读性还是变差了。
目前没有找到更优雅的方法,所以使用了一个折中的方法:
1
| configparser.ConfigParser(comment_prefixes='/', allow_no_value=True)
|
这样可以设置注释前缀为 /,配置文件里本来 # 开头的注释将被视为一个配置项。
allow_no_value=True 指定了配置文件中的项可以没有对应的值。例如,key 而不是 key=value。因为注释后面一般不会带 =。
目前的脚本功能还不是很完善,但已经足够我目前的需求了。这次编写脚本也学习到了一些新知识,还是很有收获的。
◇ 参考内容
- 用 configparser 更新配置项的时候怎么保留注释啊?. https://v2ex.com/t/779462