使用 Hexo 搭建个人博客
◇ Hexo 安装和 Blog 项目创建
▷ 安装并配置 Git
在自己电脑上配置好Git,Hexo部署到GitHub时要用。
(Scoop 相关内容参见 Scoop 相关汇总)
Git 配置参见 Git 相关汇总。
▷ 安装 NodeJS
在自己电脑上安装好NodeJS,Hexo是基于NodeJS编写的,所以需要安装NodeJS和npm工具。
▷ 安装 Hexo
Hexo是一个基于NodeJS的静态博客网站生成器,使用Hexo不需开发,只要进行一些必要的配置即可生成一个个性化的博客网站,非常方便。官网地址
1
2
| npm install -g hexo-cli
hexo -v
|
⚠️ 需要注意的是,npm中的全局安装与scoop中的全局安装不同。
在npm中,-g是--global的缩写,表示将包安装为全局包。当你使用npm install命令安装一个npm包时,它默认会将包安装在当前项目的node_modules目录中。而使用-g选项安装包时,它将会被安装在全局范围内,而不是仅限于当前项目。
具体来说,使用-g选项安装npm包时,它将被安装在你的计算机上的一个特定目录下,而不是被安装到你当前工作目录下的node_modules目录中。这意味着你可以在任何地方使用全局安装的包,而不仅仅是在当前项目中。
通常情况下,你可以在命令行中使用全局安装的包的命令。例如,如果你全局安装了nodemon包,你可以在命令行中运行nodemon命令,而不需要在每个项目中都安装nodemon包。
需要注意的是,全局安装npm包可能会导致一些问题。例如,不同的项目可能需要不同的包版本,而全局安装的包只有一个版本。另外,全局安装的包可能会与你当前项目的依赖项发生冲突。因此,建议只在确实需要全局安装的情况下使用-g选项安装npm包。
▷ 创建一个 Blog 项目
切换到需要创建项目的路径,输入以下命令:
1
2
3
| hexo init hexo-blog
cd hexo-blog
npm install
|
▷ 本地启动
1
2
3
| hexo clean
hexo generate /或 hexo g
hexo server /或 hexo s
|
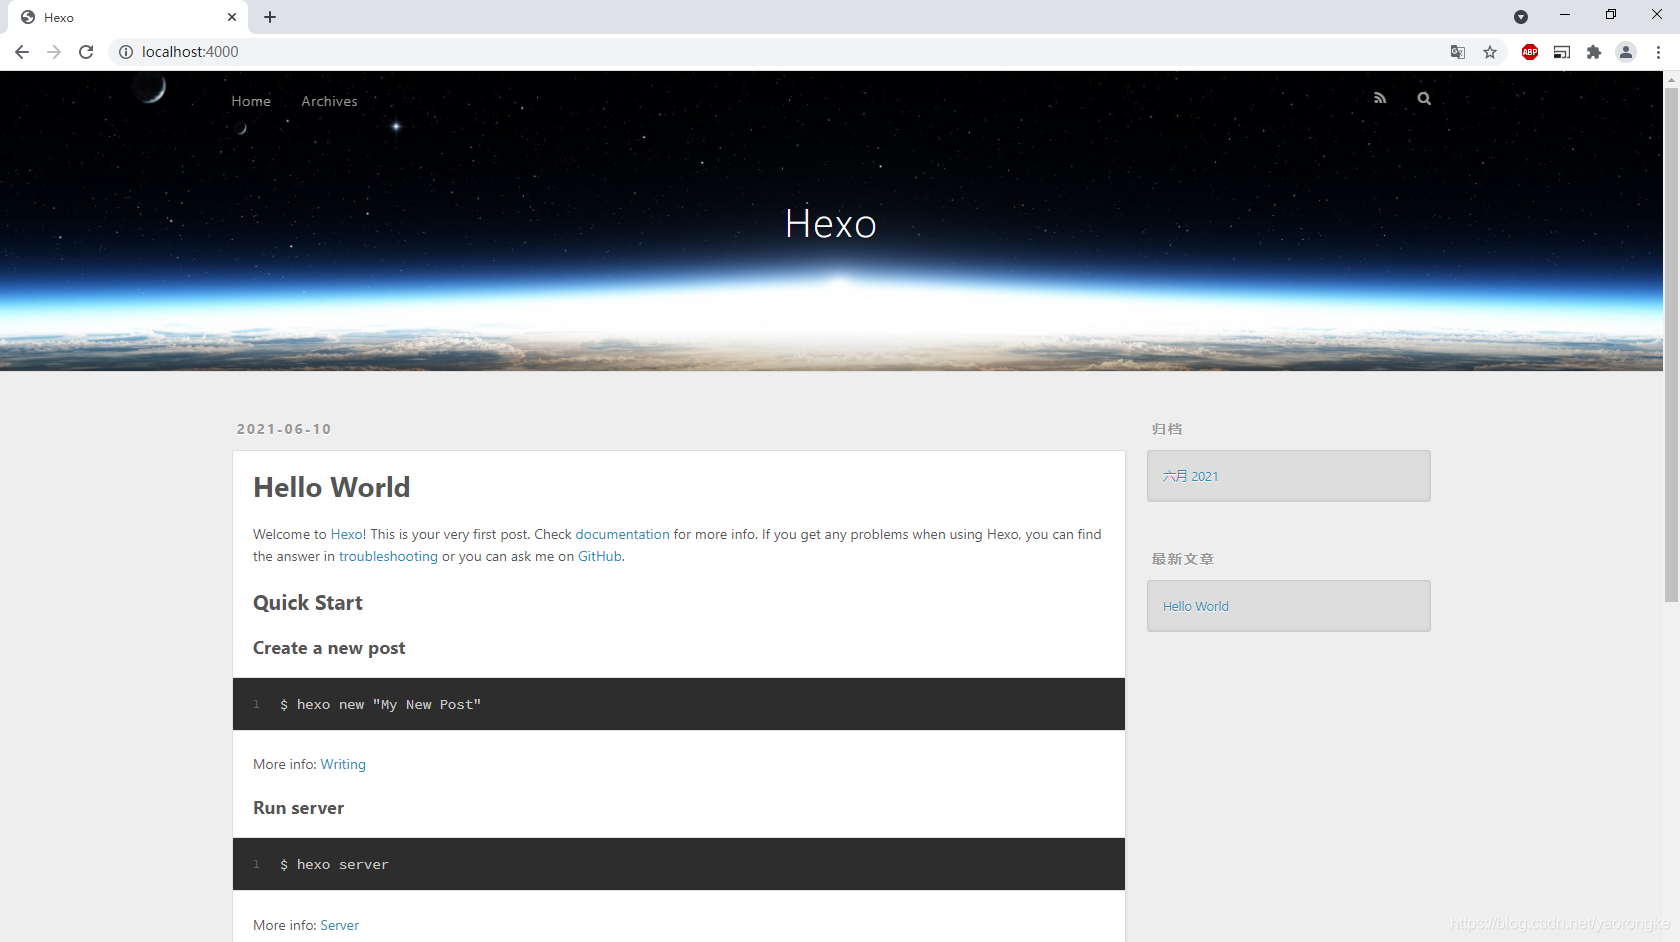
浏览器访问 http://localhost:4000,出现默认主题即成功。
◇ 更换主题
Hexo默认的主题不太好看,不过官方提供了数百种主题供用户选择,可以根据个人喜好更换(官网主题)。这里使用Fluid主题(官网)。
▷ 安装主题
Hexo 5.0.0 版本以上,推荐通过 npm 直接安装,进入博客目录执行命令:
1
| npm install --save hexo-theme-fluid
|
然后在博客目录下创建_config.fluid.yml,将主题的_config.yml内容复制过去。
⚠ 从 npm 5.x 版本开始,npm install 和 npm install --save 之间的区别不再存在。
npm install -save这条命令中,-save是什么意思?
在使用npm安装模块时,-save是一个选项参数,用于将安装的模块添加到应用程序的package.json文件中的dependencies部分。这个选项的作用是将模块的版本号信息添加到package.json文件,以便在将来重新安装应用程序时,可以自动安装所有必需的模块及其版本。
例如,如果你运行npm install express -save,则会自动将安装的Express模块的版本信息添加到package.json文件的dependencies部分,类似于以下内容:
1
2
3
| "dependencies": {
"express": "^4.17.1"
}
|
这意味着当你将应用程序部署到另一个计算机或服务器时,只需运行npm install,npm将自动安装所有必需的模块及其版本。
若想要卸载模块,可以执行以下命令:
1
2
3
| npm uninstall 模块
npm uninstall 模块 --save
npm uninstall 模块 --save-dev
|
▷ 指定主题
如下修改博客目录中的_config.yml:
1
2
| theme: fluid
language: en
|
◇ 创建内容
▷ 创建关于页 (Fluid)
首次使用主题的「关于页」需要手动创建:
创建成功后修改/source/about/index.md,添加layout属性。
修改后的文件示例如下:
1
2
3
4
5
6
7
| ---
title: 标题
layout: about
---
这里可以写正文,支持 Markdown, HTML
|
WARNING
layout: about必须存在,并且不能修改成其他值,否则不会显示头像等样式。
▷ 创建文章
执行如下命令创建一篇新文章,名为《测试文章》:
至此,便可在该文件中使用 Markdown 进行创作。
◇ GitHub Pages 部署
GitHub 部署有两种形式,一种只推送静态文件,一种包括源文件一起上传。若不希望将源文件夹上传到 GitHub,请参阅一键部署。
▷ 常规部署
1. 创建 GitHub 仓库
建立名为 <你的 GitHub 用户名>.github.io 的仓库,若之前已将 Hexo 上传至其他储存库,将该储存库重命名即可。
2. 文件配置
使用以下指令检查你电脑上的 Node.js 版本,并记下该版本 (例如:v19.y.z)
在储存库中建立 .github/workflows/pages.yml,并填入以下内容 (将hexo替换为你需要推送的远程分支, 19 替换为上个步骤中记下的版本):
1
2
3
4
5
6
7
8
9
10
11
12
13
14
15
16
17
18
19
20
21
22
23
24
25
26
27
28
29
30
31
32
33
34
35
36
37
38
39
40
41
42
| name: Pages
on:
push:
branches:
- hexo
jobs:
pages:
runs-on: ubuntu-latest
permissions:
contents: write
env:
TZ: 'Asia/Shanghai'
steps:
- uses: actions/checkout@v2
- name: Use Node.js 19.x
uses: actions/setup-node@v2
with:
node-version: "19"
- name: Cache NPM dependencies
uses: actions/cache@v2
with:
path: node_modules
key: ${{ runner.OS }}-npm-cache
restore-keys: |
${{ runner.OS }}-npm-cache
- name: Install Dependencies
run: npm install
- name: Build
run: npm run build
- name: Deploy
uses: peaceiris/actions-gh-pages@v3
with:
github_token: ${{ secrets.GITHUB_TOKEN }}
publish_dir: ./public
|
上面的代码是一个 GitHub Actions 工作流文件,用于在推送代码到 GitHub 的分支时自动构建和部署到 GitHub Pages。下面详细解释一下它所代表的含义:
1
2
3
4
5
6
| name: Pages
on:
push:
branches:
- hexo
|
name关键字用于为该工作流指定一个可读性强的名称,以描述它的作用。name: Pages即为该工作流定义了一个名为Pages的名称。
on: push表示这个工作流将在推送(push)事件发生时触发。推送事件是指将代码推送到仓库的操作。
branches字段指定了触发工作流的分支。在这个例子中,只有当推送发生在名为hexo的分支上时,才会触发这个工作流,你也可以根据你的仓库设置来指定其他分支。
因此,这段代码的意思是:当有代码推送到名为hexo的分支时,触发这个工作流执行。这可以用来确保只有在特定分支发生变化时才执行构建和部署操作,以避免在其他分支上进行不必要的构建和部署。
1
2
3
4
5
| jobs:
pages:
runs-on: ubuntu-latest
permissions:
contents: write
|
jobs 定义了一个名为 pages 的作业(job)。作业是工作流中的一个独立任务单元,可以包含多个步骤(steps)。
pages 是这个作业的名称,你可以根据自己的需求进行命名。作业可以并行或顺序执行步骤,每个步骤都定义了具体的操作。
在这个作业中,有以下关键部分:
runs-on: ubuntu-latest:这指定了作业将在 Ubuntu 操作系统的最新版本上运行。这意味着工作流将在 Ubuntu 环境中执行后续的步骤。GitHub Actions 会提供一个具有预配置软件和工具的干净的 Ubuntu 环境,以供你的工作流在其中执行。
permissions: contents: write:这个部分指定了作业对仓库内容的写权限。这是为了确保作业可以对仓库中的文件进行写操作,例如构建产物的生成和部署。
接下来,在 jobs 下面可以定义多个步骤(steps),每个步骤都会按照顺序执行。步骤可以包括构建、测试、部署等操作,以完成工作流的具体任务。
1
2
3
4
5
6
| steps:
- uses: actions/checkout@v2
- name: Use Node.js 19.x
uses: actions/setup-node@v2
with:
node-version: "19"
|
这段代码是工作流中的具体步骤(steps),它们将按照顺序执行。
uses 关键字用于指定要使用的操作(action)。操作是预定义的、可重用的代码块,它们执行特定的功能。通过在 uses 中指定操作的名称和版本,可以在工作流中引用和执行该操作。例如,actions/checkout@v2 表示使用名为 checkout 的操作,并指定了版本 v2。 actions/checkout@v2 是 GitHub Actions 官方提供的操作,它负责检出代码库到工作流环境中,以便后续步骤可以对代码进行操作。
name 关键字用于为步骤指定一个可读性强的名称,以描述该步骤的作用。名称对于阅读和理解工作流是非常有帮助的,特别是当工作流中有多个步骤时。name: Use Node.js 19.x 表示该步骤的目的是使用 Node.js 的 19.x 版本。
设置 Node.js 19.x 这个步骤使用了 GitHub Actions 官方提供的 actions/setup-node@v2 操作,它负责设定 Node.js 环境。使用 with 部分指定了 node-version: "19",告诉操作使用 Node.js 的 19.x 版本。
1
2
3
4
5
6
7
| - name: Cache NPM dependencies
uses: actions/cache@v2
with:
path: node_modules
key: ${{ runner.OS }}-npm-cache
restore-keys: |
${{ runner.OS }}-npm-cache
|
在这个步骤中,name 是指定步骤的名称,即 “Cache NPM dependencies”,用于描述这个步骤的目的。
uses 是指定使用的操作(action),即 actions/cache@v2。这个操作是 GitHub Actions 官方提供的缓存操作,用于将文件或目录的内容进行缓存,以便在后续的执行中快速恢复。
with 是指定操作的输入参数,这些参数用于指定缓存的具体配置:
path: node_modules:指定要缓存的目录路径,这里是 node_modules,即项目中的依赖项所在的目录。
key: $-npm-cache:指定用于识别和检索缓存的键。这里使用了一个动态的键,结合了操作系统类型($),以确保在不同的操作系统上使用不同的缓存。比如这里即ubuntu-npm-cache。
restore-keys:指定用于恢复缓存的键列表。这里使用了一个多行字符串(|),并列出了一个恢复键 $-npm-cache。这意味着如果找不到与主键匹配的缓存,将使用该恢复键来尝试恢复缓存。
这个步骤的目的是将 node_modules 目录中的 NPM 依赖项进行缓存,以便在后续的执行中可以快速恢复缓存,而不需要重新下载和安装依赖项,从而提高构建的速度和效率。
1
2
3
4
5
6
7
8
9
| - name: Install Dependencies
run: npm install
- name: Build
run: npm run build
- name: Deploy
uses: peaceiris/actions-gh-pages@v3
with:
github_token: ${{ secrets.GITHUB_TOKEN }}
publish_dir: ./public
|
这段代码是一个包含三个步骤的 GitHub Actions 工作流。
-
Install Dependencies(安装依赖项)
name: Install Dependencies:步骤的名称,表示正在执行的操作是安装依赖项。
run: npm install:运行的命令,使用 npm install 命令安装项目的依赖项。
-
Build(构建)
name: Build:步骤的名称,表示正在执行的操作是构建。
run: npm run build:运行的命令,使用 npm run build 命令执行项目的构建操作。
-
Deploy(部署)
name: Deploy:步骤的名称,表示正在执行的操作是部署。
uses: peaceiris/actions-gh-pages@v3:使用名为 peaceiris/actions-gh-pages 的操作,该操作是一个第三方操作,用于将静态网站部署到 GitHub Pages。
with:操作的输入参数。
github_token: $:使用内置的 GITHUB_TOKEN 密钥作为 GitHub 身份验证令牌,以便操作可以访问 GitHub API 进行部署。
publish_dir: ./public:指定要发布到 GitHub Pages 的目录路径,这里是 ./public。
这个工作流示例的目的是在执行构建之前安装项目的依赖项,然后执行构建操作,最后使用第三方操作将构建后的静态网站部署到 GitHub Pages。
3. 远程推送
将 Blog 项目文件夹中的文件 push 到远程仓库。远程推送后,Github 会自动根据上面已经配置好的 GitHub Actions 工作流,生成静态文件,并部署到 gh-pages 分支。你可以在远程仓库的 Actions 页面查看部署情况和进度。
1
2
3
| git add .
git commit -m "提交说明"
git push origin master:hexo
|
默认情况下 public/ 不会被上传(也不该被上传),确保 .gitignore 文件中包含一行 public/。整体文件夹结构应该与范例储存库大致相似。
4. GitHub 仓库设置
在 GitHub 仓库中前往 Settings > Pages > Source,并将 branch 改为 gh-pages。
5. 查看效果
浏览 <GitHub 用户名>.github.io 检查你的网站能否运作。
▷ 一键部署
若不希望将源文件夹上传到 GitHub,可参阅下面的一键部署:
1. 安装 hexo-deployer-git:
1
| npm install hexo-deployer-git --save
|
2. 在 _config.yml 中添加以下配置(如果配置已经存在,请将其替换为如下):
1
2
3
4
5
| deploy:
type: git
repo: https://github.com/<username>/<project>
branch: gh-pages
|
3. 执行以下命令:
1
2
3
| hexo clean
hexo generate /或 hexo g
hexo deploy /或 hexo d
|
当部署作业完成后,产生的页面会放在远程仓库中的 gh-pages 分支。
4. GitHub 仓库设置
在 GitHub 仓库中前往 Settings > Pages > Source,并将 branch 改为 gh-pages。
5. 查看效果
浏览 <GitHub 用户名>.github.io 检查你的网站能否运作。
▷ 项目子仓库部署
如果你希望网站部署在 <你的 GitHub 用户名>.github.io 的子目录中:
- 建立名为
<repository 的名字> 的储存库,这样你的项目网址为 <你的 GitHub 用户名>.github.io/<repository 的名字>,repository 的名字可以任意,例如 blog 或其它。
- 编辑你的
_config.yml,将 url: 更改为 <你的 GitHub 用户名>.github.io/<repository 的名字>。
- 使用上面两种方法之一将文件推送至远程仓库。
- 当部署完成后,在
gh-pages 分支可以找到生成的网页。
- 在 GitHub 储存库中,前往
Settings > Pages > Source,并将 branch 改为 gh-pages。
- 前往
https://<你的 GitHub 用户名>.github.io/<repository 的名字> 查看网站。
◇ 其它配置
▷ 设置永久链接
Hexo 默认的链接类型配置是 :year/:mouth/:day/:title,效果是http://url/2021/07/15/文章名,这种类型的 url 在文章名出现中文字符时,复制 url 就会出现一大串编码字符,不利于分享和管理。如果想为每篇文章生成唯一 ID,可以使用 hexo-abbrlink。
官网链接:https://github.com/rozbo/hexo-abbrlink
- 安装 hexo-abbrilink 插件:
1
| npm install hexo-abbrlink --save
|
- 修改 hexo 根目录下的配置文件 _config.yml
permalink 配置选项修改为如下:
1
2
3
4
| permalink: posts/:abbrlink/
abbrlink:
alg: crc32
rep: hex
|
不同算法和进制下生成的样式如下:
1
2
3
4
5
6
7
8
| crc16 & hex
https://post.zz173.com/posts/66c8.html
crc16 & dec
https://post.zz173.com/posts/65535.html
crc32 & hex
https://post.zz173.com/posts/8ddf18fb.html
crc32 & dec
https://post.zz173.com/posts/1690090958.html
|
- 自定义后缀
如果文章头中存在abbrlink,则不会做任何处理;如查文章头中不存在abbrlink,则会根据配置的alg算法来成生abbrlink字符串。
也可手动为文章设置链接地址,只需在文章中手动设置abbrlink属性即可。
▷ 设置代码折叠
- HTML
示例代码:(去掉 ``` 前的 /)
1
2
3
4
5
6
7
| <details>
<summary>点击时的区域标题</summary>
/```
这是折叠的代码1
这是折叠的代码2
/```
</details>
|
效果:
点击时的区域标题
- 使用 hexo-sliding-spoiler 插件
官网链接:https://github.com/fletchto99/hexo-sliding-spoiler
- 插件安装
1
| npm install hexo-sliding-spoiler --save
|
- 使用方法
在 markdown 中直接以标签的形式加入:(去掉 ``` 前的 /)
1
2
3
4
5
6
7
8
9
10
11
12
13
14
15
16
17
18
| {% spoiler "点击显/隐内容" %}
隐藏的内容 (支持markdown语法,代码块,数学公式)
/```c++
#include <bits/stdc++.h>
using namespace std;
int main() {
cout << "Hello World!" << '\n';
return 0;
}
/```
$$
e^{ix} = cosx+isinx
$$
{% endspoiler %}
|
- 副作用
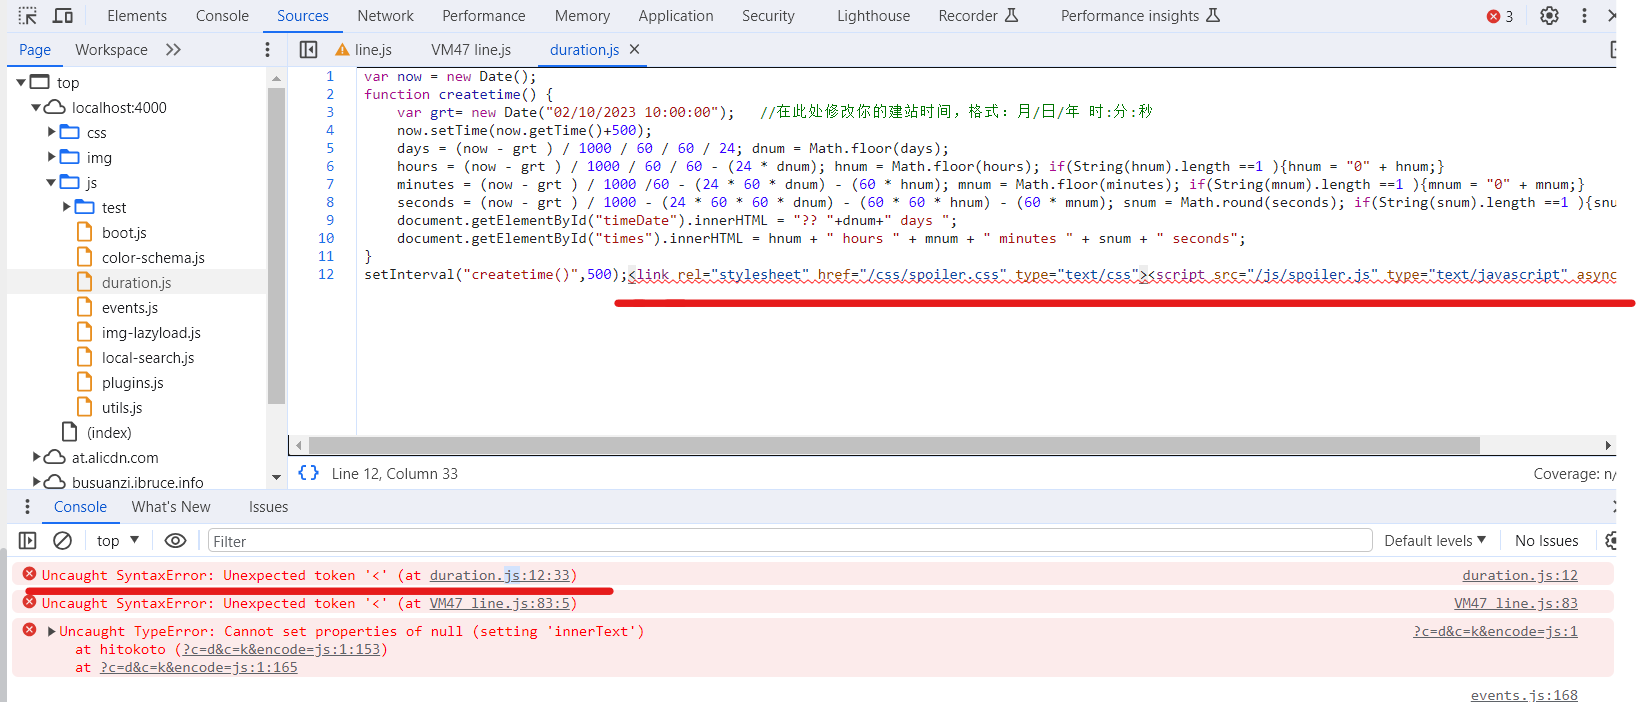
使用此插件后部分本地自定义的 JS 文件会无法运作 (比如后面的“建站时长”以及“背景美化”)。经过排查,应该是此插件会自动在 JS 文件末尾添加一行代码,导致不兼容。
理论上可以通过修改该插件代码排除特定文件,但由于本人非专业人士,尝试了半天无果,遂先放下。如果有大佬知道怎么解决请多指教!
▷ 添加 GitHub 日历热力图
这里提供一个简单的 API:https://ghchart.rshah.org/
直接在需要的位置添加如下 HTML 语句:
1
| <img src="https://ghchart.rshah.org/<username>" alt="Github chart" />
|
也可以改变颜色,修改 hex 颜色代码即可:
1
| <img src="https://ghchart.rshah.org/409ba5/<username>" alt="Github chart" />
|
图片居中:
1
2
3
| <div style="text-align: center;">
<img src="https://ghchart.rshah.org/<username>" alt="Github chart" />
</div>
|
效果:
▷ 添加评论 (Fluid)
- utterances
说明: 基于 Github Issues 的评论插件。
配置方法:
1- 首先创建一个仓库,然后点击链接:https://github.com/apps/utterances。
2- 选择刚刚建好的github仓库,然后点击安装。
3- 通过此链接进行配置:https://utteranc.es/。
4- 按照生成的配置,将关键词填入_config.fluid.yml中相应位置:
1
2
3
4
5
6
7
8
9
10
11
12
| post:
comments:
enable: true
type: utterances
utterances:
repo: github-uesrname/repo-name
issue_term: pathname
label: # utterances
theme: github-light
theme_dark: github-dark
crossorigin: anonymous
|
▷ 添加建站时长 (Fluid)
在主题配置 _config.fluid.yml 的页脚配置中增加以下内容:
1
2
3
4
5
| <div>
<span id="timeDate">Loading days...</span>
<span id="times">Loading times...</span>
<script src="/js/duration.js"></script>
</div>
|
注意添加在引号里面,完整配置如下:
1
2
3
4
5
6
7
8
9
10
11
12
| footer:
content: '
<a href="https://hexo.io" target="_blank" rel="nofollow noopener"><span>Hexo</span></a>
<i class="iconfont icon-love"></i>
<a href="https://github.com/fluid-dev/hexo-theme-fluid" target="_blank" rel="nofollow noopener"><span>Fluid</span></a>
<div>
<span id="timeDate">Loading days...</span>
<span id="times">Loading times...</span>
<script src="/js/duration.js"></script>
</div>
'
|
之后在博客目录下创建 /source/js/Duration.js,内容如下:
1
2
3
4
5
6
7
8
9
10
11
12
13
14
|
var now = new Date();
function createtime() {
var grt= new Date("02/10/2023 10:00:00");
now.setTime(now.getTime()+500);
days = (now - grt ) / 1000 / 60 / 60 / 24; dnum = Math.floor(days);
hours = (now - grt ) / 1000 / 60 / 60 - (24 * dnum); hnum = Math.floor(hours); if(String(hnum).length ==1 ){hnum = "0" + hnum;}
minutes = (now - grt ) / 1000 /60 - (24 * 60 * dnum) - (60 * hnum); mnum = Math.floor(minutes); if(String(mnum).length ==1 ){mnum = "0" + mnum;}
seconds = (now - grt ) / 1000 - (24 * 60 * 60 * dnum) - (60 * 60 * hnum) - (60 * mnum); snum = Math.round(seconds); if(String(snum).length ==1 ){snum = "0" + snum;}
document.getElementById("timeDate").innerHTML = "🌈 "+dnum+" days ";
document.getElementById("times").innerHTML = hnum + " hours " + mnum + " minutes " + snum + " seconds";
}
setInterval("createtime()",500);
|
将建站时间修改为自己的建站时间,即可在页脚加入网站运行时长。
▷ 背景美化 (Fluid)
- 添加动态线条
博客目录下创建 /source/js/DynamicLine.js,内容如下:
点击展开代码
1
2
3
4
5
6
7
8
9
10
11
12
13
14
15
16
17
18
19
20
21
22
23
24
25
26
27
28
29
30
31
32
33
34
35
36
37
38
39
40
41
42
43
44
45
46
47
48
49
50
51
52
53
54
55
56
57
58
59
60
61
62
63
64
65
66
67
68
69
70
71
72
73
74
75
76
77
78
79
80
81
82
83
|
!function() {
function o(w,v,i) {
return w.getAttribute(v)||i
}
function j(i) {
return document.getElementsByTagName(i)
}
function l() {
var i=j("script"),w=i.length,v=i[w-1];
return{
l:w,
z:o(v,"zIndex",-1),
o:o(v,"opacity",0.5),
c:o(v,"color","0,0,0"),
n:o(v,"count",99)
}
}
function k() {
r=u.width=window.innerWidth
||document.documentElement.clientWidth
||document.body.clientWidth,
n=u.height=window.innerHeight
||document.documentElement.clientHeight
||document.body.clientHeight
}
function b() {
e.clearRect(0,0,r,n);
var w=[f].concat(t);
var x,v,A,B,z,y;
t.forEach (
function(i) {
i.x+=i.xa,
i.y+=i.ya,
i.xa*=i.x>r||i.x<0?-1:1,
i.ya*=i.y>n||i.y<0?-1:1,
e.fillRect(i.x-0.5,i.y-0.5,1,1);
for(v=0;v<w.length;v++) {
x=w[v];
if(i!==x&&null!==x.x&&null!==x.y) {
B=i.x-x.x,z=i.y-x.y,y=B*B+z*z;
y<x.max&& (
x===f&&y>=x.max/2&&(i.x-=0.03*B,i.y-=0.03*z),
A=(x.max-y)/x.max,
e.beginPath(),
e.lineWidth=A/2,
e.strokeStyle="rgba("+s.c+","+(A+0.2)+")",
e.moveTo(i.x,i.y),
e.lineTo(x.x,x.y),
e.stroke()
)
}
}
w.splice(w.indexOf(i),1)
}
),m(b)
}
var u=document.createElement("canvas"),
s=l(),
c="c_n"+s.l,
e=u.getContext("2d"),
r,n,m=window.requestAnimationFrame
||window.webkitRequestAnimationFrame
||window.mozRequestAnimationFrame
||window.oRequestAnimationFrame
||window.msRequestAnimationFrame
||function(i){window.setTimeout(i,1000/45)},
a=Math.random,
f={x:null,y:null,max:20000};
u.id=c;
u.style.cssText="position:fixed;top:0;left:0;z-index:"+s.z+";opacity:"+s.o;
j("body")[0].appendChild(u);
k(),window.onresize=k;
window.onmousemove=function(i){i=i||window.event,f.x=i.clientX,f.y=i.clientY},
window.onmouseout=function(){f.x=null,f.y=null};
for(var t=[],p=0;s.n>p;p++) {
var h=a()*r,g=a()*n,q=2*a()-1,d=2*a()-1;
t.push({x:h,y:g,xa:q,ya:d,max:6000})
}
setTimeout(function(){b()},100)
}();
|
然后在主题配置 _config.fluid.yml 中找到 custom_js,修改如下:
1
2
| custom_js:
- /js/DynamicLine.js
|
- 添加动态彩带
设置方法同上。
点击展开代码
1
2
3
4
5
6
7
8
9
10
11
12
13
14
15
16
17
18
19
20
21
22
23
24
25
26
27
28
29
30
31
32
33
34
35
36
37
38
39
40
41
42
43
44
45
46
47
48
49
50
51
52
53
54
55
56
57
58
59
60
61
62
63
64
65
66
67
68
69
70
71
72
73
74
75
76
77
78
79
80
81
82
83
84
85
86
87
88
89
90
91
92
93
94
95
96
97
98
99
100
101
102
103
104
105
106
107
108
109
110
111
112
113
114
115
116
117
118
119
120
121
122
123
124
125
126
127
128
129
130
131
132
133
134
135
136
137
138
139
140
141
142
143
144
145
146
147
148
149
150
151
152
153
154
155
156
157
158
159
160
161
162
163
164
165
166
167
168
169
170
171
172
173
174
175
176
177
178
179
180
181
182
183
184
185
186
187
188
189
190
191
192
193
194
195
196
197
198
199
200
201
202
203
204
205
206
207
208
209
210
211
212
213
214
215
216
217
218
219
220
221
222
223
224
225
226
227
228
229
230
231
232
233
234
235
236
237
238
239
240
241
242
243
244
245
246
247
248
249
250
251
252
253
254
255
256
257
258
259
260
261
262
263
264
265
266
267
268
269
270
271
272
273
274
275
276
277
278
279
280
281
282
283
284
285
286
287
288
289
290
291
292
293
294
295
296
297
298
299
300
301
302
303
304
305
306
307
308
309
310
311
312
313
314
315
316
317
318
319
320
321
322
323
324
325
326
327
|
(function (name, factory) {
if (typeof window === "object") {
window[name] = factory()
}
})("Ribbons", function () {
var _w = window,
_b = document.body,
_d = document.documentElement;
var random = function () {
if (arguments.length === 1) {
if (Array.isArray(arguments[0])) {
var index = Math.round(random(0, arguments[0].length - 1));
return arguments[0][index]
}
return random(0, arguments[0])
} else if (arguments.length === 2) {
return Math.random() * (arguments[1] - arguments[0]) + arguments[0]
}
return 0
};
var screenInfo = function (e) {
var width = Math.max(0, _w.innerWidth || _d.clientWidth || _b.clientWidth || 0),
height = Math.max(0, _w.innerHeight || _d.clientHeight || _b.clientHeight || 0),
scrollx = Math.max(0, _w.pageXOffset || _d.scrollLeft || _b.scrollLeft || 0) - (_d.clientLeft || 0),
scrolly = Math.max(0, _w.pageYOffset || _d.scrollTop || _b.scrollTop || 0) - (_d.clientTop || 0);
return {
width: width,
height: height,
ratio: width / height,
centerx: width / 2,
centery: height / 2,
scrollx: scrollx,
scrolly: scrolly
}
};
var mouseInfo = function (e) {
var screen = screenInfo(e),
mousex = e ? Math.max(0, e.pageX || e.clientX || 0) : 0,
mousey = e ? Math.max(0, e.pageY || e.clientY || 0) : 0;
return {
mousex: mousex,
mousey: mousey,
centerx: mousex - screen.width / 2,
centery: mousey - screen.height / 2
}
};
var Point = function (x, y) {
this.x = 0;
this.y = 0;
this.set(x, y)
};
Point.prototype = {
constructor: Point,
set: function (x, y) {
this.x = x || 0;
this.y = y || 0
},
copy: function (point) {
this.x = point.x || 0;
this.y = point.y || 0;
return this
},
multiply: function (x, y) {
this.x *= x || 1;
this.y *= y || 1;
return this
},
divide: function (x, y) {
this.x /= x || 1;
this.y /= y || 1;
return this
},
add: function (x, y) {
this.x += x || 0;
this.y += y || 0;
return this
},
subtract: function (x, y) {
this.x -= x || 0;
this.y -= y || 0;
return this
},
clampX: function (min, max) {
this.x = Math.max(min, Math.min(this.x, max));
return this
},
clampY: function (min, max) {
this.y = Math.max(min, Math.min(this.y, max));
return this
},
flipX: function () {
this.x *= -1;
return this
},
flipY: function () {
this.y *= -1;
return this
}
};
var Factory = function (options) {
this._canvas = null;
this._context = null;
this._sto = null;
this._width = 0;
this._height = 0;
this._scroll = 0;
this._ribbons = [];
this._options = {
colorSaturation: "80%",
colorBrightness: "60%",
colorAlpha: 0.65,
colorCycleSpeed: 6,
verticalPosition: "center",
horizontalSpeed: 150,
ribbonCount: 5,
strokeSize: 5,
parallaxAmount: -0.5,
animateSections: true
};
this._onDraw = this._onDraw.bind(this);
this._onResize = this._onResize.bind(this);
this._onScroll = this._onScroll.bind(this);
this.setOptions(options);
this.init()
};
Factory.prototype = {
constructor: Factory,
setOptions: function (options) {
if (typeof options === "object") {
for (var key in options) {
if (options.hasOwnProperty(key)) {
this._options[key] = options[key]
}
}
}
},
init: function () {
try {
this._canvas = document.createElement("canvas");
this._canvas.style["display"] = "block";
this._canvas.style["position"] = "fixed";
this._canvas.style["margin"] = "0";
this._canvas.style["padding"] = "0";
this._canvas.style["border"] = "0";
this._canvas.style["outline"] = "0";
this._canvas.style["left"] = "0";
this._canvas.style["top"] = "0";
this._canvas.style["width"] = "100%";
this._canvas.style["height"] = "100%";
this._canvas.style["z-index"] = "-1";
this._onResize();
this._context = this._canvas.getContext("2d");
this._context.clearRect(0, 0, this._width, this._height);
this._context.globalAlpha = this._options.colorAlpha;
window.addEventListener("resize", this._onResize);
window.addEventListener("scroll", this._onScroll);
document.body.appendChild(this._canvas)
} catch (e) {
console.warn("Canvas Context Error: " + e.toString());
return
}
this._onDraw()
},
addRibbon: function () {
var dir = Math.round(random(1, 9)) > 5 ? "right" : "left",
stop = 1000,
hide = 200,
min = 0 - hide,
max = this._width + hide,
movex = 0,
movey = 0,
startx = dir === "right" ? min : max,
starty = Math.round(random(0, this._height));
if (/^(top|min)$/i.test(this._options.verticalPosition)) {
starty = 0 + hide
} else if (/^(middle|center)$/i.test(this._options.verticalPosition)) {
starty = this._height / 2
} else if (/^(bottom|max)$/i.test(this._options.verticalPosition)) {
starty = this._height - hide
}
var ribbon = [],
point1 = new Point(startx, starty),
point2 = new Point(startx, starty),
point3 = null,
color = Math.round(random(0, 360)),
delay = 0;
while (true) {
if (stop <= 0) break;
stop--;
movex = Math.round((Math.random() * 1 - 0.2) * this._options.horizontalSpeed);
movey = Math.round((Math.random() * 1 - 0.5) * (this._height * 0.25));
point3 = new Point();
point3.copy(point2);
if (dir === "right") {
point3.add(movex, movey);
if (point2.x >= max) break
} else if (dir === "left") {
point3.subtract(movex, movey);
if (point2.x <= min) break
}
ribbon.push({
point1: new Point(point1.x, point1.y),
point2: new Point(point2.x, point2.y),
point3: point3,
color: color,
delay: delay,
dir: dir,
alpha: 0,
phase: 0
});
point1.copy(point2);
point2.copy(point3);
delay += 4;
color += this._options.colorCycleSpeed
}
this._ribbons.push(ribbon)
},
_drawRibbonSection: function (section) {
if (section) {
if (section.phase >= 1 && section.alpha <= 0) {
return true
}
if (section.delay <= 0) {
section.phase += 0.02;
section.alpha = Math.sin(section.phase) * 1;
section.alpha = section.alpha <= 0 ? 0 : section.alpha;
section.alpha = section.alpha >= 1 ? 1 : section.alpha;
if (this._options.animateSections) {
var mod = Math.sin(1 + section.phase * Math.PI / 2) * 0.1;
if (section.dir === "right") {
section.point1.add(mod, 0);
section.point2.add(mod, 0);
section.point3.add(mod, 0)
} else {
section.point1.subtract(mod, 0);
section.point2.subtract(mod, 0);
section.point3.subtract(mod, 0)
}
section.point1.add(0, mod);
section.point2.add(0, mod);
section.point3.add(0, mod)
}
} else {
section.delay -= 0.5
}
var s = this._options.colorSaturation,
l = this._options.colorBrightness,
c = "hsla(" + section.color + ", " + s + ", " + l + ", " + section.alpha + " )";
this._context.save();
if (this._options.parallaxAmount !== 0) {
this._context.translate(0, this._scroll * this._options.parallaxAmount)
}
this._context.beginPath();
this._context.moveTo(section.point1.x, section.point1.y);
this._context.lineTo(section.point2.x, section.point2.y);
this._context.lineTo(section.point3.x, section.point3.y);
this._context.fillStyle = c;
this._context.fill();
if (this._options.strokeSize > 0) {
this._context.lineWidth = this._options.strokeSize;
this._context.strokeStyle = c;
this._context.lineCap = "round";
this._context.stroke()
}
this._context.restore()
}
return false
},
_onDraw: function () {
for (var i = 0, t = this._ribbons.length; i < t; ++i) {
if (!this._ribbons[i]) {
this._ribbons.splice(i, 1)
}
}
this._context.clearRect(0, 0, this._width, this._height);
for (var a = 0; a < this._ribbons.length; ++a) {
var ribbon = this._ribbons[a],
numSections = ribbon.length,
numDone = 0;
for (var b = 0; b < numSections; ++b) {
if (this._drawRibbonSection(ribbon[b])) {
numDone++
}
}
if (numDone >= numSections) {
this._ribbons[a] = null
}
}
if (this._ribbons.length < this._options.ribbonCount) {
this.addRibbon()
}
requestAnimationFrame(this._onDraw)
},
_onResize: function (e) {
var screen = screenInfo(e);
this._width = screen.width;
this._height = screen.height;
if (this._canvas) {
this._canvas.width = this._width;
this._canvas.height = this._height;
if (this._context) {
this._context.globalAlpha = this._options.colorAlpha
}
}
},
_onScroll: function (e) {
var screen = screenInfo(e);
this._scroll = screen.scrolly
}
};
return Factory
});
new Ribbons({
colorSaturation: "60%",
colorBrightness: "50%",
colorAlpha: 0.5,
colorCycleSpeed: 5,
verticalPosition: "random",
horizontalSpeed: 200,
ribbonCount: 3,
strokeSize: 0,
parallaxAmount: -0.2,
animateSections: true
});
|
- 添加静态彩带
设置方法同上。
点击展开代码
1
2
3
4
5
6
7
8
9
10
11
12
13
14
15
16
17
18
19
20
21
22
23
24
25
26
27
28
29
30
31
32
33
34
35
36
37
38
39
40
41
42
43
44
45
46
47
48
49
50
51
52
53
54
55
56
57
58
59
60
61
62
63
64
|
! function() {
function attr(node, attr, default_value) {
return Number(node.getAttribute(attr)) || default_value;
}
var scripts = document.getElementsByTagName('script'),
script = scripts[scripts.length - 1];
config = {
z: attr(script, "zIndex", -1),
a: attr(script, "alpha", 0.6),
s: attr(script, "size", 90),
};
var canvas = document.createElement('canvas'),
g2d = canvas.getContext('2d'),
pr = window.devicePixelRatio || 1,
width = window.innerWidth,
height = window.innerHeight,
f = config.s,
q, t,
m = Math,
r = 0,
pi = m.PI*2,
cos = m.cos,
random = m.random;
canvas.width = width * pr;
canvas.height = height * pr;
g2d.scale(pr, pr);
g2d.globalAlpha = config.a;
canvas.style.cssText = 'opacity: ' + config.a + ';position:fixed;top:0;left:0;z-index: ' + config.z + ';width:100%;height:100%;pointer-events:none;';
document.getElementsByTagName('body')[0].appendChild(canvas);
function redraw() {
g2d.clearRect(0, 0, width, height);
q = [{x: 0, y: height * 0.7 + f}, {x: 0, y: height * 0.7 - f}];
while(q[1].x < width + f) draw(q[0], q[1]);
}
function draw(i, j) {
g2d.beginPath();
g2d.moveTo(i.x, i.y);
g2d.lineTo(j.x, j.y);
var k = j.x + (random()*2-0.25)*f, n = line(j.y);
g2d.lineTo(k, n);
g2d.closePath();
r -= pi / -50;
g2d.fillStyle = '#'+(cos(r)*127+128<<16 | cos(r+pi/3)*127+128<<8 | cos(r+pi/3*2)*127+128).toString(16);
g2d.fill();
q[0] = q[1];
q[1] = {x: k, y: n};
}
function line(p){
t = p + (random() * 2 - 1.1) * f;
return (t > height || t < 0) ? line(p) : t;
}
document.onclick = redraw;
document.ontouchstart = redraw;
redraw();
}();
|
◇ 自定义域名
▷ 设置自定义域名
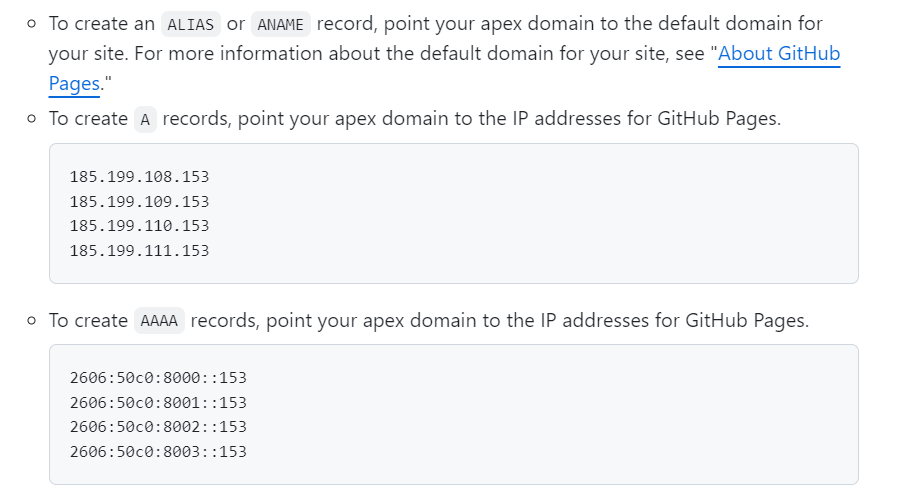
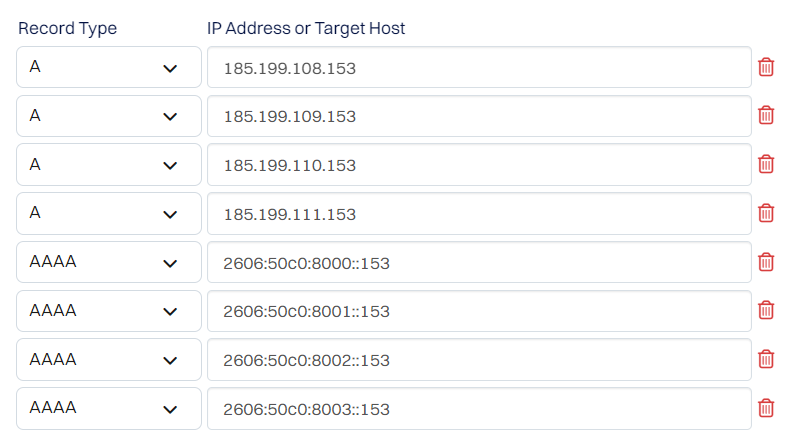
- 域名解析
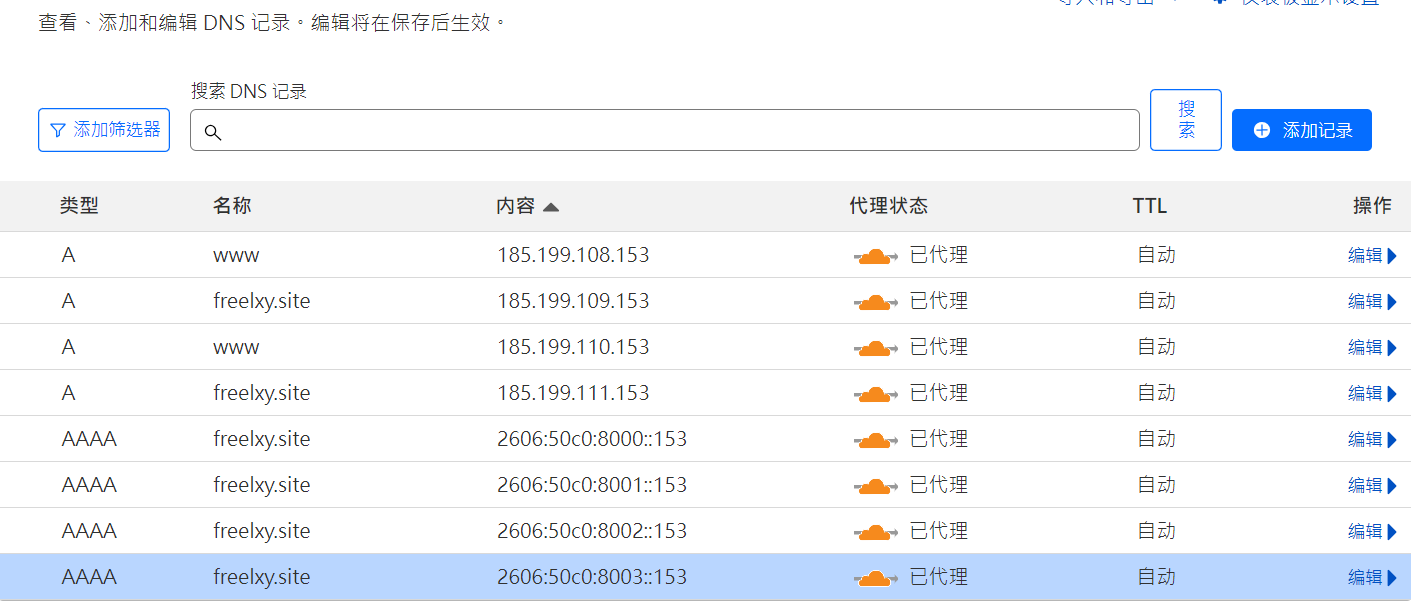
进入域名管理控制台,将官方文档 (链接) 中的 IP 地址添加到解析列表,如下图所示:
或是使用 CNAME 方式,如下图所示:

两种方式的简单解释:
- A/AAAA 记录:将一个域名解析到一个 IP(IPv4/IPv6) 地址,如上面例子即将个人域名解析到配置的 IP 地址;
- CNAME 记录:将一个域名解析到另外一个域名,如上面例子即将个人域名解析到 example.github.io。
- 设置 CNAME
1- 在本地项目中的 source 文件夹下面创建 CNAME 文件 (没有后缀名),打开文件输入自定义域名,如下所示,然后推送到远程仓库。
2- 在 github 项目 Settings -> Pages -> Custom domain 检查是否已有刚才输入的自定义域名,并推荐勾选 Enforce HTTPS,如下图所示:
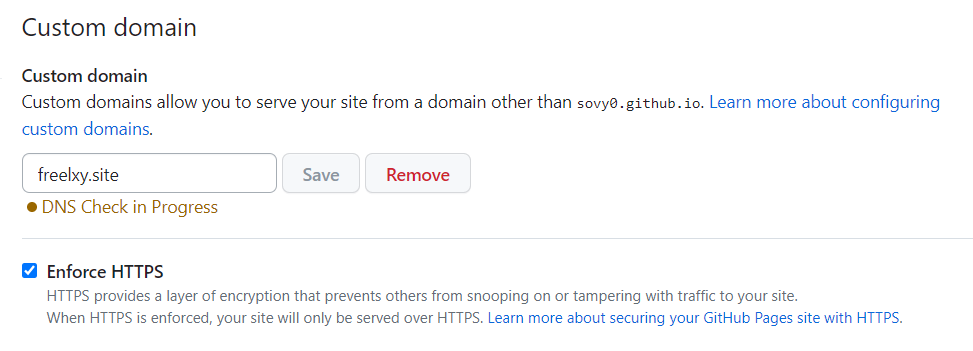
或者直接在上图修改也行,修改后会自动创建 CNAME 文件。
- 更改配置
将 _config.yml 配置文件中的 url 更改为自定义域名,这里主要是显示用途。
1
| url: https://freelxy.site/
|
- 配置完成
配置后不一定会马上生效,这里涉及到 DNS 广播,一般耗时几个小时,最长 48 个小时,可以通过下面的网站来查询 DNS 状态。
- https://dnschecker.org/
- https://www.whatsmydns.net/
- https://ping.chinaz.com/
▷ 使用 Cloudflare 进行 CDN 加速
由于 Github 国内访问可能不稳定,可以尝试利用 Cloudflare CDN 增加稳定性。Cloudflare 官网地址:https://cloudflare.com
- 在 Cloudflare 中添加站点
根据提示添加站点并选择免费计划后,Cloudflare 会自动检测原来的解析记录,如果解析记录不对,可以在下面修改。一般来说,原来的解析记录在我们使用了 CDN 后,就可以全部删除了,当然也可以直接在 Cloudflare 这儿修改 DNS 记录。
- 更改 NameServers
上个步骤完成后,点击 Continue 会进入到下图所示的一个提示界面,这个界面提示你需要到域名注册商那儿修改 NameServers。
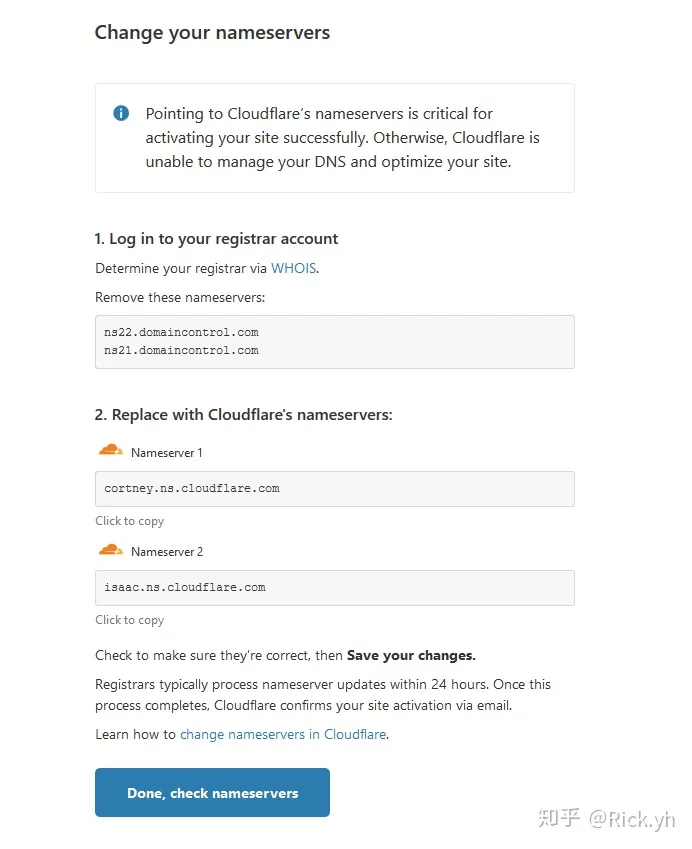
根据提示在域名注册商那边修改 NameServers 即可:
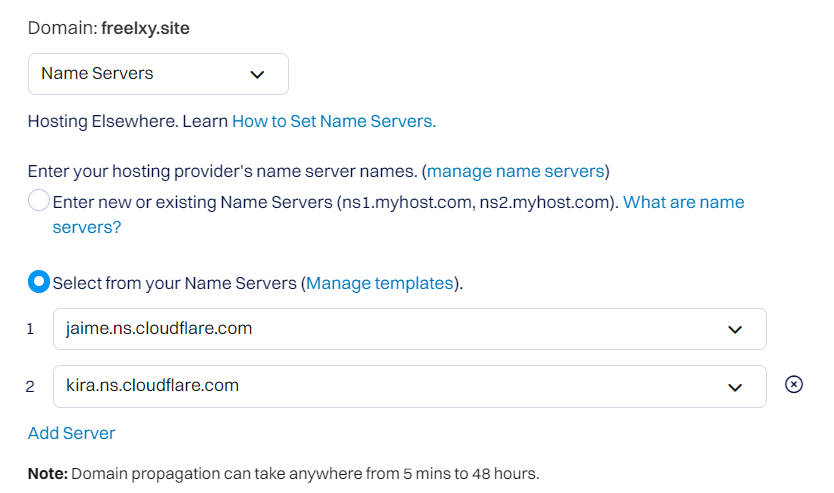
修改保存后等待几分钟,成功后 Cloudflare 会发来邮件提醒。
- 更改 SSL/TLS 加密模式
完成之后浏览器访问博客网站,可能会发现浏览器报错,显示“重定向次数过多”,无法访问:
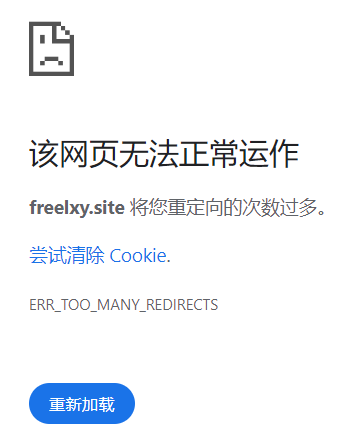
原因:
GitHub Page 中打开了 Enforce HTTPS,这会让所有 HTTP 的链接重定向到 HTTPS 中。
而 Cloudflare 回源使用的是 HTTP 链接,于是就出现了一遍遍的重定向,最终次数过多浏览器报错。

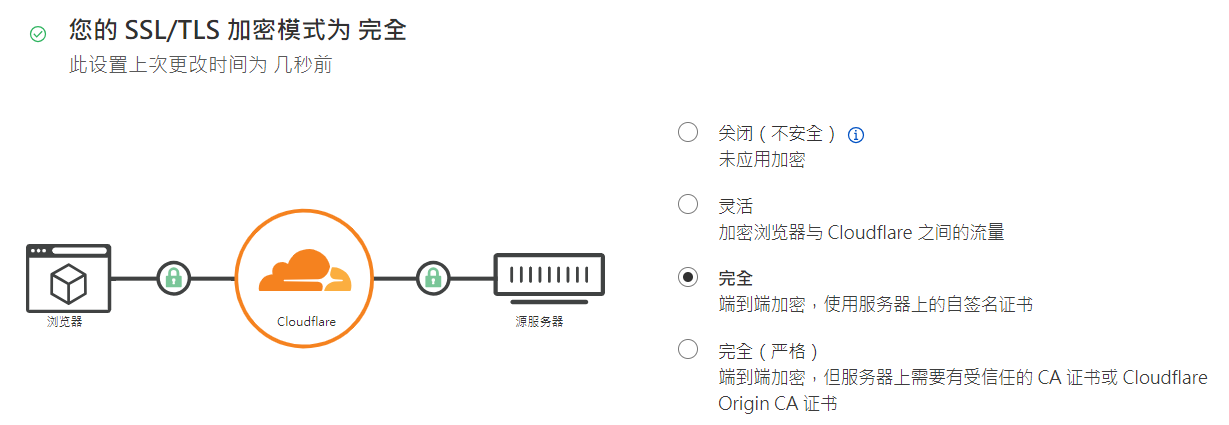
解决方法:
将 Cloudflare 中的 SSL/TLS 加密模式 由 关闭 或 灵活 改为 完全 即可。
- 其它设置
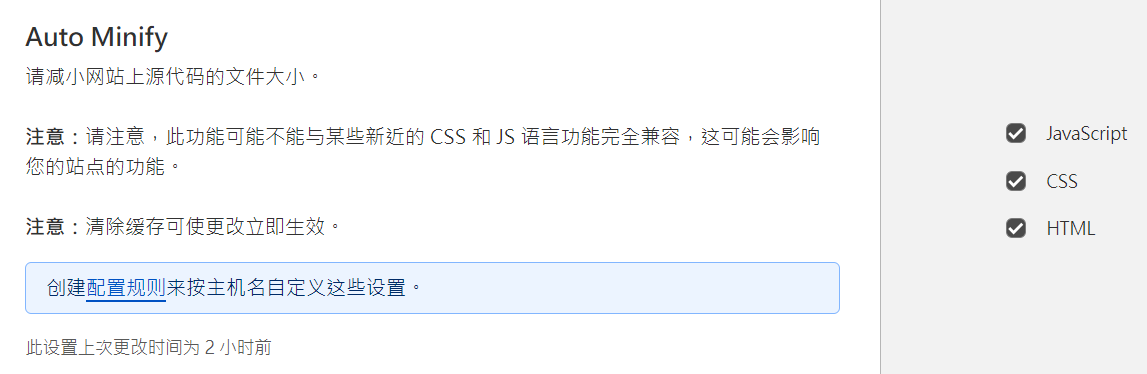
> 开启压缩功能,加快响应速度
Auto Minify 可以从源代码中删除不必要的字符(如空格和注释等),而不会更改源代码的功能。缩小可以压缩源文件的大小,这可以减少需要传输给访问者的数据量,进而缩短页面加载时间。
配置路径:速度 > 优化 > 内容优化 > Auto Minify
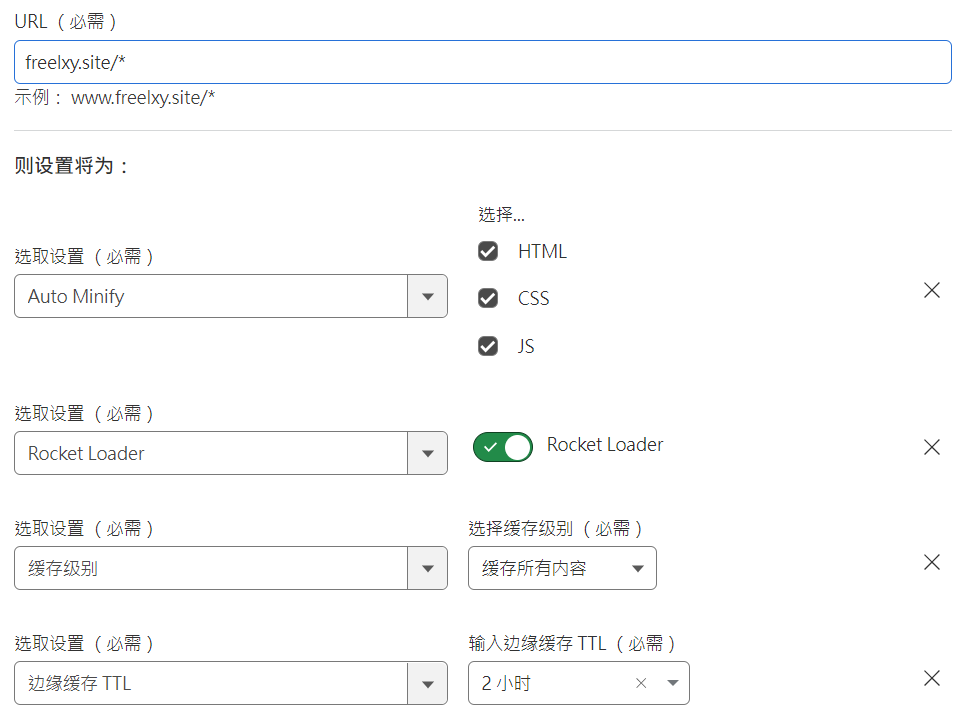
> 页面规则 (Page Rules),更精细的缓存控制
Cloudflare 为免费用户提供了 3 条页面规则,对于免费的用户来说基本上够了,如果你的网站没有动态交互,是静态的,只需要使用一条规则就可以实现全站缓存,当然动态站我们可以利用 3 条规则把 js, css, 图片文件全部缓存起来。下面是全站缓存的设置,具体规则可以看看帮助文档。
配置路径:规则 > 页面规则
> 始终使用 HTTPS
将所有使用方案 “http” 的请求重定向到 “https”。这将应用于该区域的所有 http 请求。此功能将使用同等 “https” URL 的 301 重定向答复所有使用 “http” 的 URL 请求。如果您只希望重定向一部分请求,请考虑创建“始终使用HTTPS”页面规则。
配置路径:SSL/TLS > 边缘证书 > 始终使用 HTTPS

> 自动 HTTPS 重写
自动 HTTPS 重写通过将可以使用 HTTPS 提供服务的网站上所有资源或链接的 “http” 更改为 “https” 来帮助修正混合内容。
配置路径:SSL/TLS > 边缘证书 > 自动 HTTPS 重写

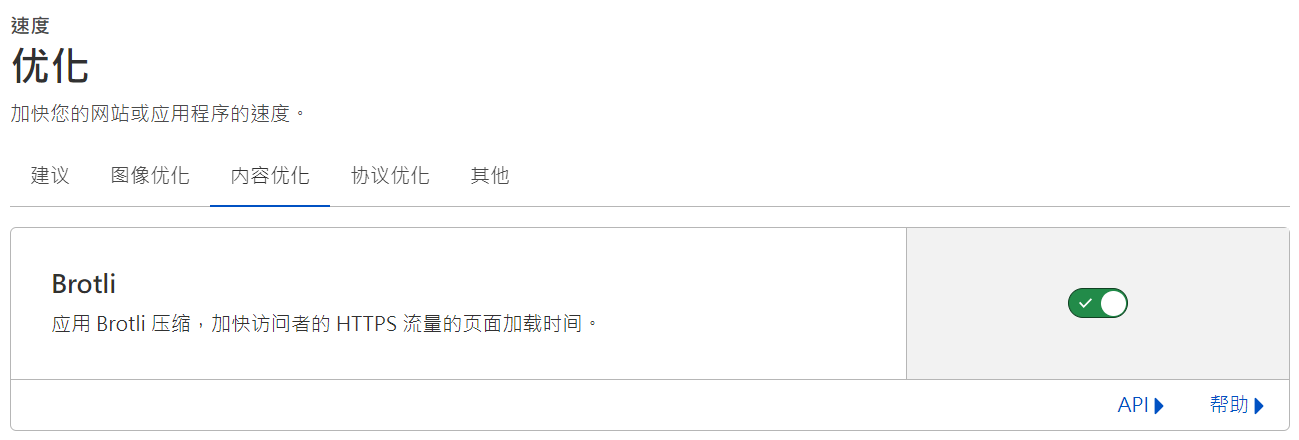
> 应用 Brotli 压缩,加快访问者的 HTTPS 流量的页面加载时间
Cloudflare 应用 Brotli 压缩来帮助加快访问者的页面加载时间。如果客户端支持多种压缩方法,Cloudflare 将选择 Brotli 压缩作为首选的内容编码方法。如果客户端未指明其支持 Brotli 压缩,将应用 gzip 压缩。
配置路径:速度 > 优化 > 内容优化 > Brotli
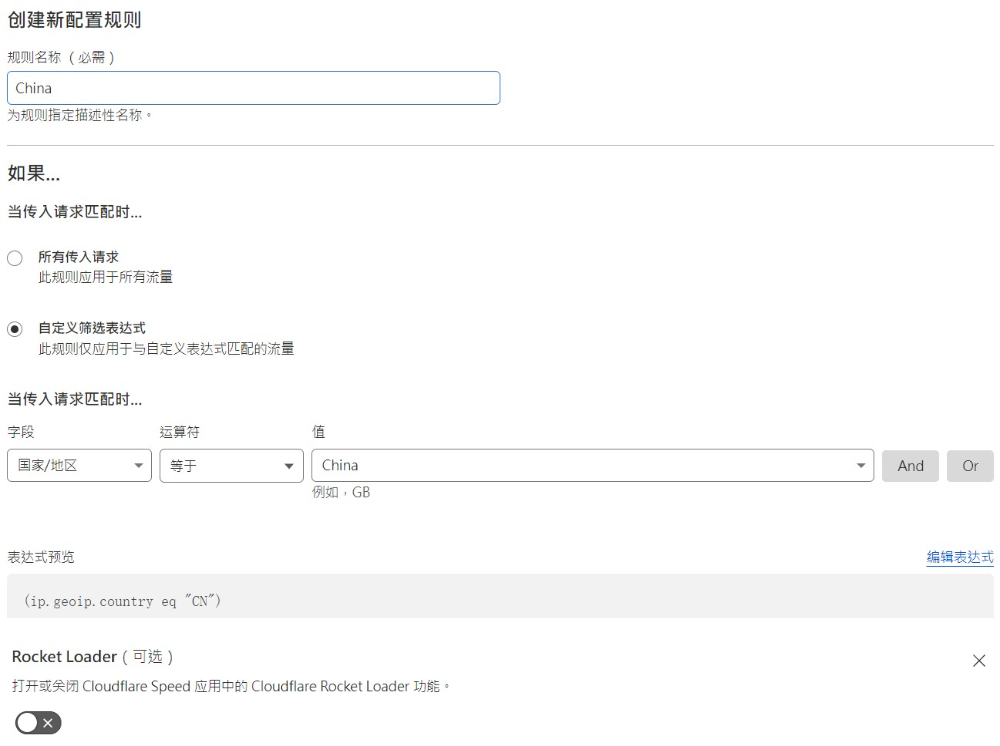
> 为国内用户禁用 Rocket Loader
Rocket Loader 可缩短包含 JavaScript 的页面绘制时间。如果打开此选项, script 的类型会变为 type=’text/rocketscript’, 如果你看到某个网站的 javascript 的 type 都是 text/rocketscript, 你就知道这个使用了Cloudflare CDN 并且开启了 Rocket Loader。
理论上开启 Rocket Loader 是有利于页面加载速度的提升的,但因为 CloudFlare 的 IP 节点都是境外,加上 Rocket Loader 会在页面里引用并下载 ajax.cloudflare.com 和 cdnjs.cloudflare.com 这两个站外 JS 库,这就会造成国内站点在引用这两个 JS 库的时候加大了页面延迟时间,加速的好事儿变成了拖慢速度的坏事儿了,所以CloudFlare 的 Rocket Loader 并不适合国内站点,或者说不适合国内访客。如何解决?我们可以借助配置规则在边缘和服务器进行区别对待:
配置路径:规则 > Configuration Rules
◇ Cloudflare Pages 部署
如果要部署在 Cloudflare Pages,先在 Github 设置中删除自定义域名,然后删除相关的 DNS 记录。
在 Cloudflare 中创建一个 Page,选择 “连接到 Git”,登录 Github 账号选择博客项目的 gh-pages 分支,直接点击 “保存并部署” 即可。
Cloudflare 会自动进行操作,然后分配一个域名地址,成功后就可以访问站点了。如果想使用自己的域名,直接点击 “自定义域” 即可一键添加自定义域名。
◇ Hexo 相关命令
1
2
3
4
5
6
7
8
9
10
11
12
13
| hexo init <project_name>
hexo init
hexo new post <title>
hexo new draft <title>
hexo publish <title>
hexo clean
hexo generate /或 hexo g
hexo server /或 hexo s
hexo deploy /或 hexo d
|
◇ NodeJs 相关命令
1
2
3
4
5
6
7
8
| npm list
npm outdated
npm outdated <package-name>
npm update
npm update <package-name>
npm update -g
|
⚠ 关于全局安装:
通过 Scoop 安装后,nodejs 全局安装的模块会在 D:\Scoop\persist\nodejs\bin\node_modules路径。
如果同时安装并切换了别的版本,如 nodejs16,卸载原先版本会导致无法读取之前全局安装的模块,解决方法是重新全局安装,路径为 D:\Scoop\persist\nodejs16\bin\node_modules, 或是重新下载回原先版本。
◇ Fluid 相关命令与配置
▷ 命令相关
在博客目录下执行命令:
1
2
3
| npm install --save hexo-theme-fluid
npm update --save hexo-theme-fluid
npm uninstall --save hexo-theme-fluid
|
▷ 便签
在 markdown 中加入如下的代码来使用便签:
1
2
3
| {% note primary %}
文字内容(支持markdown格式)
{% endnote %}
|
或者使用 HTML 形式:
1
| <p class="note note-primary">文字内容</p>
|
可选颜色:
◇ 模板
便签:
1
2
3
| {% note info %}
{% endnote %}
|
代码折叠:
1
2
3
4
| <details>
<summary>点击展开代码</summary>
</details>
|
◇ 参考内容
- GitHub Pages + Hexo搭建个人博客网站,史上最全教程. https://blog.csdn.net/yaorongke/article/details/119089190
- Hexo 官方文档. https://hexo.io/zh-cn/docs
- Fluid 官方文档. https://fluid-dev.github.io/hexo-fluid-docs
- npm卸载模块. https://blog.csdn.net/qq_38543537/article/details/78522199
- Hexo博客链接持久化解决方案. https://www.yulate.com/37.html
- hexo-fluid添加utterances评论功能(详细图文过程). https://www.jianshu.com/p/785d727810b3
- Hexo博客绑定个人域名. https://cloud.tencent.com/developer/article/1964349
- 将自己的域名绑定在GitHub的个人网页库中(以namesilo为例). https://zhuanlan.zhihu.com/p/448781791
- 为GitHub Pages上的个人博客绑定GoDaddy域名. https://www.wenvenn.com/20211211/wei-github-page-shang-de-ge-ren-bo-ke-bang-ding-godaddy-yu-ming/
- cloudflare使用入门教程,国外最好免费CDN. https://zhuanlan.zhihu.com/p/82909515
- 解决Cloudflare+GitHub Page出现重定向次数过多问题. https://www.9kr.cc/archives/181/
- 使用 CloudFlare 要不要关闭 Rocket Loader. https://juejin.cn/post/7238586490955399229
- cloudflare Rocket Loader建议中国使用者关闭. http://www.yehes.com/wangluo/18853.html
- Hexo + Fluid 美化. https://cloud.tencent.com/developer/article/2142662
- Hexo Fluid 代码折叠. https://wty-yy.space/posts/44830/
- Markdown代码折叠与收起. https://guoflight.github.io/posts/28189/